Uli's Web Site |
![[ Zathras.de - Uli's Web Site ]](http://www.zathras.de/angelweb/themes/barsnstripes/img/masthead_blog.jpg) |
|
Uli's Web Site |
|
|
| blog |
15 Most Recent [RSS]
More... |
Pimp my Mac
Okay, here's the promised documentation of the Clockwork Racing Edition upgrade to my PowerMac G4 "Digital Audio". And yeah, it really is faster. Noticeably so. And of course I'm watching a DVD in the background as I'm writing this. So, here's how it went: Preparations![[So this is how my Mac sees me...]](files/clockwork_racing_end.jpg) Well, first, take the CD-ROM that FastMac ships together with the CPU upgrade and read the docs in there. They're about four pages of PDF with pictures, and in particular they include info on how to jumper the CPU card for the MHz rate you want. In my case, the CPU upgrade already came with the right settings, but if it doesn't, you may want to make sure you have this written down or printed out for later. But don't take the CPU board out of its protective plastic bag, yet. Well, first, take the CD-ROM that FastMac ships together with the CPU upgrade and read the docs in there. They're about four pages of PDF with pictures, and in particular they include info on how to jumper the CPU card for the MHz rate you want. In my case, the CPU upgrade already came with the right settings, but if it doesn't, you may want to make sure you have this written down or printed out for later. But don't take the CPU board out of its protective plastic bag, yet.Also, if you're doing the SuperDrive upgrade like I did, make sure you've removed any CDs from the old drive, and that you have Apple's DVD Player installed. You can do the latter afterwards if you deleted it from your hard drive, but from what I've been able to determine, there's no separate installer, so you may have to reinstall the system to get it (or hijack a copy from another Mac with the same system version). Ready? Then let's get going: Unplug the Mac. Completely. The power supply in the G4 is a transformer, which means it can work in both directions. So, if e.g. you just unplug the G4, but leave the screen attached, the low-voltage current can go the wrong way into the power supply, get transformed back up to 220 Volts (at the cost of some Amperes) and give you some nice burn marks on your hand. We wouldn't want that. Opening a G4 is easy. Pull on the latch at the side, and the side wall will swing down. Make sure you put the Mac on a carpet or a soft cloth to make sure you don't scratch the casing. Before you touch anything inside, make sure you've touched your radiator or even better are grounded, so you're in no way statically charged, because that may fry electronics. Replacing the CPU![[New CPU on board, old cooler and CPU in hand, scratch on finger]](files/clockwork_racing09.jpg) The CPU is under the huge silver heat sink that you see on the folded-out side wall before you. It is held to the small daughter card with two iron clamps that hook into the bottom side. The card itself is screwed fast, so don't pull on it. Instead, push down the metal tabs that are closer towards the front (e.g using a screwdriver), which will make them unhook. Now take a small screwdriver to lever the hooks out from under the card. The CPU is under the huge silver heat sink that you see on the folded-out side wall before you. It is held to the small daughter card with two iron clamps that hook into the bottom side. The card itself is screwed fast, so don't pull on it. Instead, push down the metal tabs that are closer towards the front (e.g using a screwdriver), which will make them unhook. Now take a small screwdriver to lever the hooks out from under the card.This will require some force, but be careful not to touch any of the components on the CPU card, and be even more careful you don't slip and damage anything on the main board. There are a number of easily-damaged chips close by. The best vantage point to get some leverage is the cooling ribs themselves and, if you're very careful, the small circuit board itself. It's easy to scratch yourself during this (as the photo below proves), so stay away from pointy soldered pins and make sure you don't bleed all over the board ;-) Once the heat sink is removed, there are three screws to be pulled out. The whole card is plugged into a socket, so be careful when pulling it up not to twist it too much, and FastMac suggests you only hold it on the sides of the card, which is very good advice (as is all of theirs). ![[New CPU on board, old cooler and CPU in hand, scratch on finger]](files/clockwork_racing01.jpg) The CPU upgrade is a daughter card of the same size, but it has a smaller, copper-colored heat sink and a fan. There's a small covering on the plug at the bottom of the card, which you have to remove. Then plug it in, making sure the screwholes are aligned, careful to only apply pressure above the socket. The CPU upgrade is a daughter card of the same size, but it has a smaller, copper-colored heat sink and a fan. There's a small covering on the plug at the bottom of the card, which you have to remove. Then plug it in, making sure the screwholes are aligned, careful to only apply pressure above the socket.Now, make sure the jumpers on the board are set as per the instructions. The small plastic things go either over the two pins to connect them ("ON" in the docs), or you can shift it up so it's only over one pin (for "OFF"). The numbers of the jumpers are printed on the board below them. This is fiddly, so you may need pliers or someone with small hands. Now screw the new card on (the hole next to the fan plug is a little hard to reach), and you can close the Mac and give it a test run. In my case, the speed is tripled. Woo-hoo! Replacing the CD DriveThe SuperDrive is really trivial to do, though not quite as obvious to figure out. Essentially, the two drive slots (the CD-Drive's 5.25 bay and the 3.5 bay for the ZIP drive below it) are in two metal boxes bolted to each other. They sit on a sled that is pulled out through the front.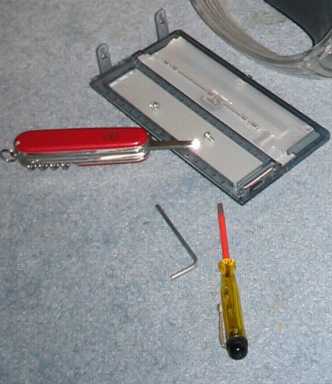 To do that, you have to remove the front covering for the two drives. There are two long plastic tongues protruding into the inside, next to the drives. Push those two out and the front covering will tilt out. The two tongues on the other side are very short, so don't be afraid to tilt it to get it off. Between the two drive bays are two screws that hold the covering in place. Pull those out. ![[Pulling out the drive requires some force]](files/clockwork_racing03.jpg) Once that is done, you can just grab the whole sled and push it out through the front. The cables in the back are fairly long, but not long enough to set the drive down once pulled out. So, pull it halfway out and unplug them. Don't tear the tapes when removing them so you can use them again later. As always, the small power plug is very hard to detach, you may have to use the screwdriver for leverage. Once that is done, you can just grab the whole sled and push it out through the front. The cables in the back are fairly long, but not long enough to set the drive down once pulled out. So, pull it halfway out and unplug them. Don't tear the tapes when removing them so you can use them again later. As always, the small power plug is very hard to detach, you may have to use the screwdriver for leverage.![[Unscrewing the drive from the casing]](files/clockwork_racing04.jpg) There are four screws at the bottom of the 5.25 area of the case holding fast the drive. Unscrew them. You can also remove the metal covering the back of the case to make it easier to push out the drive. Then check that the SuperDrive is jumpered correctly and slide it into the sled. It'd be really annoying if you had to take the Mac apart again just because the jumpers aren't set. Again, FastMac had already jumpered everything. There are four screws at the bottom of the 5.25 area of the case holding fast the drive. Unscrew them. You can also remove the metal covering the back of the case to make it easier to push out the drive. Then check that the SuperDrive is jumpered correctly and slide it into the sled. It'd be really annoying if you had to take the Mac apart again just because the jumpers aren't set. Again, FastMac had already jumpered everything.![[Bye bye, old drive...]](files/clockwork_racing05.jpg) Make sure you've pushed it all the way in, so the screwholes in the drive align with the ones in the cage. Screw fast the drive, and plug in the cables after leading them through the holes in the back cover. The lengths of the drives may not be the same, but it's no problem if the SuperDrive is a tad longer or shorter than the sled. The back cover can be attached in several positions to hold it fast. Make sure you've pushed it all the way in, so the screwholes in the drive align with the ones in the cage. Screw fast the drive, and plug in the cables after leading them through the holes in the back cover. The lengths of the drives may not be the same, but it's no problem if the SuperDrive is a tad longer or shorter than the sled. The back cover can be attached in several positions to hold it fast.![[DVD drive screwed in, the front cover is next]](files/clockwork_racing08.jpg) Once the back covering is back on and you've re-attached the tapes, slide the sled back in, screw it fast, and re-apply the covering. The final thing left is the RAM. RAM goes into the three slots to the left of the CPU. My Mac already had two slots used, but the third one was still empty. Once the back covering is back on and you've re-attached the tapes, slide the sled back in, screw it fast, and re-apply the covering. The final thing left is the RAM. RAM goes into the three slots to the left of the CPU. My Mac already had two slots used, but the third one was still empty.If you need to remove old RAM, pull the small white plastic clamps at both ends of each slot away. They should tilt aside and the chip can be pulled out. To install the new RAM, push it firmly into the slot. There are two ridges that go into two slits on the little RAM chip board, so there's no way to put it in the wrong way. Then close the clamps to secure the chip in place. This may require some fiddling to get the chip locked in properly, but RAM chips are fairly sturdy. Here's some more pictures: 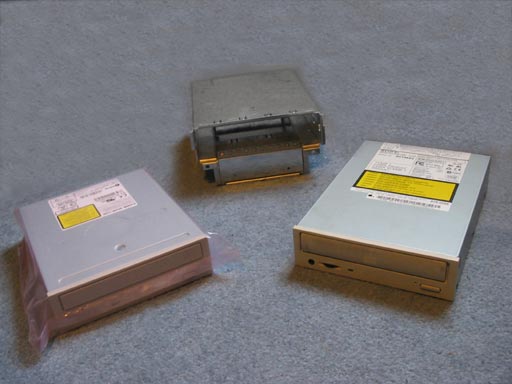 New drive, old drive, and the sled. 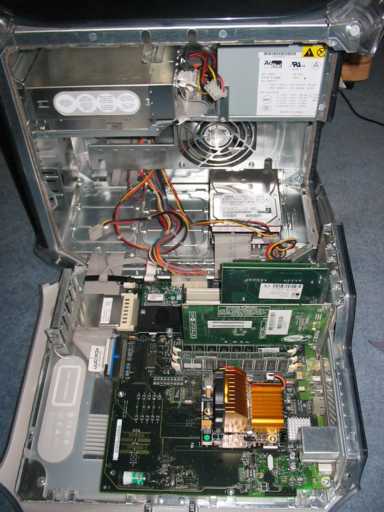 Thanks to:
| ||||||||||||||||||||||||||||||||||||||||||||||||||||||||||||||||||||||||
|
Created: 2005-02-11 @786 Last change: 2026-04-20 @900 | Home | Admin | Edit © Copyright 2003-2026 by M. Uli Kusterer, all rights reserved. |